Folder | GDBVersions |
Purpose | Use these tools to list, create, and delete versions in your enterprise geodatabase through ArcGIS server. |
Services | GDBVersions (geoprocessing service). |
Geoprocessing tasks | ListVersions, CreateVersion, DeleteVersion |
Inputs | Enterprise geodatabase—name of version to create or delete |
Outputs | ListVersions outputs a table of versions in the geodatabase |
Data | User must provide an enterprise geodatabase |
Extensions | None |
Corresponding folder
The data for this example can be downloaded from ArcGIS.com. Once downloaded, extract the zip file to C:\arcgis\ArcTutor. The GP Service Examples\GDBVersions folder contains the completed models and Python scripts.
About this example
This example shows the detailed steps of creating and using a geoprocessing service containing tasks to manage geodatabase versions. The ListVersions, CreateVersion, DeleteVersion model tools used in the service are derived from tools in the Data Management toolbox Versions toolset. These geoprocessing tasks allow you to get a list of versions in the geodatabase, create new versions, or delete existing versions. Applications can use these tools to support versioned editing workflows involving map services and feature services. Depending on the application requirements, not all tasks may need to be published. For example, only the ListVersions task is required if the application needs to support only switching between versions.
Data
This example requires an existing enterprise geodatabase that has the versions you want to expose to users through your geoprocessing service.
Model and tool data
The toolbox for the geoprocessing service is GDBVersions.tbx.
Model overview
To better understand the models, expand the GDBVersions.tbx toolbox.
ListVersions
Right-click the ListVersions model and select Edit to open the model in ModelBuilder. The ListVersions model is illustrated below. There is one input variable, Enterprise_GDB. When running the model, you must provide the connection to the enterprise geodatabase you want to use.

The VersionListToTable tool is a script tool that is also provided in GDBVersions.tbx. You can review the Python code executed by the tool by right-clicking the VersionListToTable script and choosing Edit to open the Python code in your default Python IDE. The script creates an output table and populates it with information about public and protected versions and private versions owned by the user provided with the Enterprise_GDB connection.
Note:
If using operating system authentication with the connection, this includes public and protected versions, as well as private versions owned by the account that ArcGIS Server runs under. In a typical ArcGIS Installation, the server will run under the ArcGIS account that is created and configured at installation time.
The output table contains the following information about each version:
| Field | Description |
|---|---|
name | The fully qualified name for the version. |
access | Indicates if the version is public, private, or protected. |
created | The date the version was created. |
description | The description stored with the version. |
isowner | Indicates whether or not the connected user owns the version. |
lastmodified | The date the version was last modified. |
parentversionname | The name of the parent version. |
By default, an in-memory table named versions is created. You can also modify the model to create a table that is written to the input geodatabase. Each time the ListVersions tool is run, the previously created table will be deleted and replaced with a new table.
CreateVersion
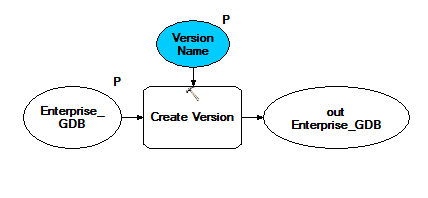
Right-click the CreateVersion model and select Edit. The CreateVersion model is illustrated below. There are two input variables: the Version Name of the new version to create and the Enterprise_GDB. When running the model, you must provide the connection to the enterprise geodatabase you want to use with the Enterprise_GDB parameter as you did for the ListVersions model previously. If you plan to publish this model along with the other models, make sure to reference the same enterprise geodatabase connection.

The CreateVersion tool creates a new version in the enterprise geodatabase that is referenced in the Enterprise_GDB using the name provided by the Version Name parameter. In the model, the version is created from the default version and made private. You can change these parameters to suit your application. An error will be returned if you attempt to create a version that already exists when executing the task or service.
DeleteVersion
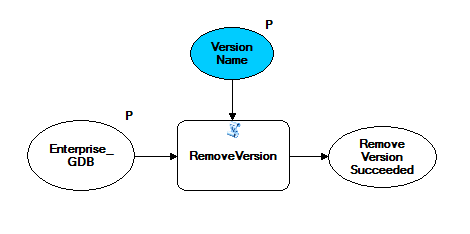
Right-click the DeleteVersion model and select Edit to open the model in ModelBuilder. The DeleteVersion model is illustrated below. There are two input variables: the Version Name of the version to delete and the Enterprise_GDB. When running the model, you must provide the connection to the enterprise geodatabase you want to use with the Enterprise_GDB parameter. If you plan to publish this model along with the other models, make sure to reference the same enterprise geodatabase connection.

The RemoveVersion tool deletes an existing version from the enterprise geodatabase referenced in the Enterprise_GDB using the name provided and outputs a Boolean variable containing True if the tool succeeded in deleting the version. The name provided must be the fully qualified name of the version. The ListVersions tool can be used to get the fully qualified name. The RemoveVersion tool is a script tool that is also provided in GDBVersions.tbx toolbox. You can review the Python code executed by the tool by right-clicking the script tool and choosing Edit. The script tool calls the DeleteVersion tool with the input version name as a string parameter. An error is returned if you do not have permissions to delete the version, the version doesn’t exist, or has dependent ancestor versions.
Make a server management connection for publishing
Make sure you have the permission to publish to the server. If you do, follow the steps below to create a publisher or management connection to a server:
- Go to GIS Servers > Add ArcGIS Server to bring up the Add ArcGIS Server dialog box.
- Check Publish GIS Services or Administer GIS Server.
- On the General panel, enter a value for Server admin URL and provide values for User Name and Password.
- Click Finish to complete the connection.
Creating a service
- In the Catalog window, navigate to C:\arcgis\ArcTutor\GP Service Examples\GDBVersions.
Since you may be making edits to the models, it is a good practice to copy and paste the entire GDBVersions directory to another local directory from which you can make modifications.
- Double-click one of the model tools you want to publish to open its dialog box.
- Set the Enterprise_GDB parameter to your enterprise geodatabase.
- Click OK to run the tool.
When the tool finishes executing, a new result is written to the Results window. To open the Results window, choose Geoprocessing > Results in the ArcMap main menu.
- Check that the tool executed successfully by examining the result in the Results window. A failed execution displays an error icon
 next to the result.
 - Repeat steps 1 to 5 for the other model tools you want to publish.
Steps to create a geoprocessing service
To create a geoprocessing service, you share a result.
- In the Results window, right-click one of the results generated above and select Share As > Geoprocessing Service. The Share As Service wizard opens.
- Choose the server you want to publish to and the folder in which you want to store the services. The default name of the service is the same as the tool name. You can accept the default service name or enter a new name.
- On the last panel of the Share As Service wizard, clickContinue to open the Service Editor.
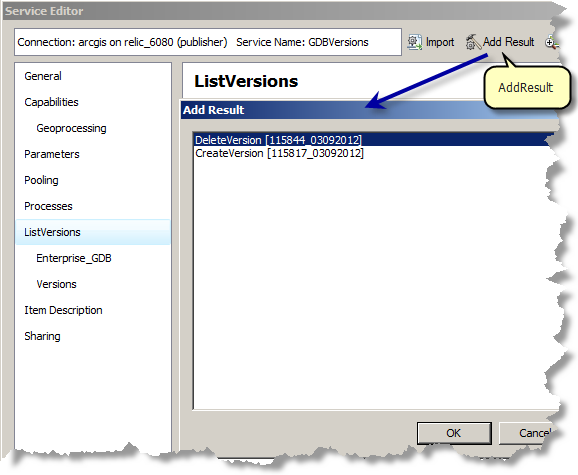
- To add another task, click the Add Result
 button to open the Add Result dialog box. In the Add Result dialog box, choose another of the above results and click OK. To add another task, repeat step 4.
 - On the Parameters page of the Service Editor, change the Execution Mode to Synchronous as the service will execute quickly.

 to publish the service.
Using the geoprocessing service
The following steps show how to use the geoprocessing services that you previously published.
- Open a new ArcMap document.
- In the Catalog window, navigate to your server connection under GIS Servers, find the geoprocessing service that you published in the previous section, and expand it. The tasks you published previously appear.
- Double-click the ListVersions task to open the task dialog box.
- Click OK to run the geoprocessing task.
The output is returned as a table in the GPInMemoryWorkspace. You can open the table to see the list of versions in the enterprise geodatabase.
- If you published the CreateVersion task:
- Double-click the task CreateVersion to open the task dialog box.
- Provide the name of the version you want to create.
- Click OK to run the geoprocessing task.
- Repeat steps 1 through 4. Note that the new version appears in the new output table.
- If you published the DeleteVersion task:
- Double-click the task DeleteVersion to open the task dialog box.
- Provide the fully qualified name of the version you want to create (for example, the version that was just created in the steps above).
- Click OK to run the geoprocessing task.
- Repeat steps 1 through 4. Note that the version has been removed and therefore does not appear in the new output table.